The paper is to be very plain, sufficiently brief, and is intended to lead to practical results; but whether such intention succeeds will, as usual, depend on the obedience and sympathy of those to whom it is addressed.
I was asked the other day to make a set of shelves to hold a few books, and while engaged in the work I determined to jot down a few notes upon those pitfalls which would beset an amateur not quite up to the mark who might undertake a similar job. To an onlooker nothing can be more simple and apparently easy than to cut out and put together a plain set of shelves, especially if they are to be nailed together; yet not a few make a terrible mess of it.
The material in my own case was not such as I can recommend, as it was obtained from a packing case with many bruises and nail holes, to say nothing of remnants of nails, which are sore teasers of the plane and chisels if not detected and summarily extracted. Such boards are not satisfactory, as it is next to impossible to conceal old nail holes unless the article is to be painted. Preferably, I would use clean oak; but American ash, pitch pine, or even ordinary deal, will answer, and can be stained of any desired colour with one of Stephens’ excellent wood stains.
The first process will be to get out the stuff, that is to saw and plane up the several pieces required. Learn well, dear reader, and lay to heart that sterling truth— “Labor Omnia Vincit,” and be prepared for some real work. If it is shirked, stinted, or otherwise maltreated, do not hope for success. Still, we will not in this case wear out the willing workman, as the article need not be more than 2ft. square, or 2ft. by 2ft. 3in., and the sides and shelves some 3in. or 4in. wide. Of course, these dimensions can be increased at will; but a small set of shelves will serve as well as larger ones the purpose of present instruction.
Do not make a flimsy affair of thin stuff. Let the sides plane to ¾ or 1in. if the size is to be 2ft. 6in. or 3ft., and the shelves only a little less in thickness. The edges will be chamfered, which takes away any appearance of clumsiness, while thick stuff always looks far handsomer than thin (except in the case of paper with certain well-known watermarks and numbers). The sides may be planed up as one, and sawn afterwards; or cut into the intended form and planed separately. The latter is perhaps the easier mode, as the surface to be levelled is less extensive; but the other is surer. All depends on the width and length of the material in stock.
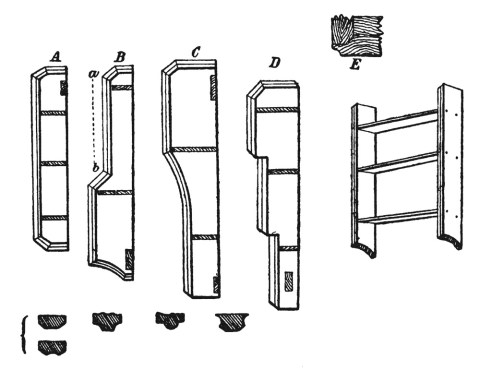
The shape may be like A, B, or C. Curves are difficult to cut and chamfer nicely, and straight, severe lines look best. In C the broadest shelf is put upwards, and this overhanging notion has a very good appearance. A set with sides like D, which I made, look very well indeed.
Now, as to planing: It is very often done very badly. The stock of planes should include three for face work or plane surfaces —a Jack plane, a smoothing plane, and a trying plane. The two former are indispensably necessary; because, if you use your small hand plane to clean off the rough outside of a board, you will have to resharpen and reset the irons for finishing; and, what is more, you can never get a true surface with a short plane. It is sheer waste of time, and false economy to stint yourself in necessary tools. To work a chamfer again from a to b of the pattern B, you should have a stop-chamfer or bull-nosed plane; but we shall come to that presently.
It is seldom that an amateur has his plane keen enough. To grind and set it needs a lot of arm work, and he is apt to shirk it. The certain result is bad work. A Jack plane-iron is generally sharpened so as to give the edge a slight curve—i.e., the iron projects rather more in the centre than at the angles, which are eased off. For roughing down a surface this is the best form.
Not so with the two other planes, of which the irons must be straight and true as a mathematical right line; the bottom of the tool or sole of the plane being also truly level, so that when the iron is set for work it appears like a bright needle almost, just visible from end to end, as the eye looks along the plane of the sole towards it. Practice alone will enable anyone to sharpen and set this tool correctly; but no pains should be spared to gain the knack—for knack it is—of using the oilstone in a workmanlike manner.
A great deal of wood is cross-grained and tiresome to work. When it is so the plane may be held at any angle so as to bring the iron slantingly against the grain, which will cause it to attack the rough crooked grain with a drawing action like that of a knife. The smoothing plane, set so fine that it brings off shavings as thin as tissue paper, has often to be worked round about knots and curls with an almost circular motion. A good deal of pressure is required at last if the plane is finely set, and this gives a high polish to the surface of the wood. Sandpaper will spoil this, and should not be used if it can be avoided.
Sometimes, however, it is absolutely necessary where the curled grain has given trouble, or where the end grain is exposed, as it will be when the tenon saw has been used to cut off the stuff neatly across. It is not, however, for producing a finished or smooth surface, so much as a level and true one that the plane is necessary; and if left untrue, there is little hope of a workmanlike job being accomplished.
It is very easy to produce a winding surface—i.e., a surface which is all on the twist, one or two corners higher than the others. With a long plane used on so small a piece of stuff as the sides of these shelves, it is fairly easy to get a true level, but if the smoothing plane is too freely used afterwards, the work is apt to get hollow, or otherwise untrue. Test it with straight-edge, and winding strips therefore, and stick to it until fairly satisfactory. These are not unnecessary precautions, and if they are neglected, the sure result will be that when all the parts are put together the whole concern will be twisted. Laid on either face on a level surface, its defects in this respect will be painfully evident.
Looking at B, the grooves will be seen for two shelves only. A was meant to take two only, and a back rail above the top one, upon which to screw the two brass suspenders for hanging them; but three grooves are shown. The grooves should not quite reach the front, so as to avoid cutting the chamfers; but if it is so cut, the shelf should be cut like E, to get neatly over the edge and project beyond, embracing as it were the chamfered part of the side.
E is a plan view of a bit of the shelf and upright side in section. This is evidently more difficult to fit, as the joint should be barely perceptible, and if the grooves are made as at B, this fitting will be avoided. The unbroken line of chamfered edge always looks well. The corner of the shelf may then be cut like G, keeping the edge level with that of the side. The dotted line is added to show the projection of the shelf into the groove.
Now this groove presents a source of trouble, in so far that if one end of it is deeper than the other, or wider, the fit will be spoilt, and in the former case the set of shelves will be crooked. Hence let nothing be done haphazard. Scribe all lines, and in sawing out the grooves, which you can do nearly the full length with a tenon saw, be sure to leave the scribed lines upon the work —saw inside them. Then with a sharp chisel cut out the stuff, working neatly into the front angles, where you cannot well get the saw. Scribe the depth on both front and back, and test it when done, because as the shelves are all cut of one exact length, any groove made too deep will cause a gap between the end of that shelf and bottom of the groove.
There is a plane for this grooved work called a router, or old woman’s tooth, to insure accuracy of depth, but you can do well enough with a chisel. If not truly level, let the groove be slightly deeper in the middle. This makes no visible gap, but it should be quite level. The sides can be let in by similar grooves in the bottom shelf, made long enough to extend an inch or two each way beyond the sides, or it may be inserted like the others into the sides, which should, in that case, project two inches below it. The latter mode is, perhaps, more general, but it is only a question of taste.
The only thing that remains to be done is to put the whole together by nails, the heads of which can be countersunk, and the holes filled up with putty if the shelves are to be painted or coloured. Neatly done, this will not show, and is the simplest method. Bore holes, use clasp nails two inches long, and drive home carefully. There are modes of securing the work without nails, which I will leave for a second paper. Screws are no use inserted with the grain into the ends of the shelves, and glue alone is insufficient.
Now, to conclude, I would call attention to the following secrets of a satisfactory job of this kind:—
1. Very sharp tools.
2. Careful gauging and marking out.
3. Leaving all such gauge lines on the work, sawing and chiselling inside them.
4. Level and true planing.
5. Grooves of equal depth and width.
6. Straightly cut edges and chamfers. Mark these by gauge, and plane exactly to to line. Do not fancy you can work without gauge lines.
O.J.L.
The English Mechanic and World of Science – Friday, October 12, 1883
—Jeff Burks