


Most of the historical sources I have in my library say that joiners should dovetail the corners of their tool chests. In my heart, I agree. But in reality, the archaeological record paints a different picture.
There are lots of dovetailed tool chests out there – I see them all the time. But I also see lots of chests that violate all the joinery rules of traditional tool chests, and yet they are still together after decades of abuse.
Many tool chests are simply nailed together – I own a few of these myself. They don’t look as tidy as a dovetailed chest, but they can last a long time – especially if the joints are tight and the skirts around the chest are made well and tightly nailed.
If you are unsure about your dovetailing skills, my first reaction is to tell you to get over it and give dovetails a try – the joint’s difficulty is usually all in your head. But if you aren’t willing to cut dovetails, then consider joining your chest using rabbets and cut nails. Or dowels, screws, Dominoes or biscuits.
What about the materials for your tool chest? I recommend lightweight pine. But what if you don’t have access to clear pine? Or you don’t have the tools (or skills) to glue up the panels required for your tool chest? You know what else is lightweight and strong? Plywood. Don’t like plywood? Buy ready-made pine panels from the home center. These are as ugly as snot because of all the little bits of finger-jointed boards, but a couple coats of paint will make the panels look world-class. They usually come in 24” widths, so you will have a head start on the construction process.
Can’t make a bottom of shiplapped boards? Consider a nailed-on plywood bottom.
Don’t want to dovetail the skirts and dust seal around the carcase? Use simple miters instead – just make sure to spline or nail them to give them extra strength.
How about the chest’s top? What if you don’t have the tools or skills to make a frame-and-panel top? Again, plywood can be your friend – or use one of the ready-made pine panels and apply a smaller panel on the top to make it look like a frame-and-panel top. This applied “raised panel” is not just decoration – it adds thickness and strength.
How about those sliding trays inside? Nail them together if you cannot use dovetails. Just be smart about it – angle the nails like the slope of dovetail joints and nail through the ends of the trays and into the fronts to add strength.
There are lots of other shortcuts you can take. Use strap hinges or a piano hinge, which are easier to install. Use an external hasp instead of a half-mortise lock. Reinforce the corners of your chest with iron or steel plates – I see those all the time on old chests. These can look very cool.
In other words, disobey me.
In “The Anarchist’s Tool Chest” I made a case for using the best joinery, materials and hardware available to build your chest. For some woodworkers, that might not be dovetails, clear Eastern white pine and Horton brasses. It might be nails, plywood and Hillman fasteners. So be it. Do the best job that you can with the skills that you have, and you’ll do fine.
You might want to upgrade your tool chest in 10 years once you have the skills to dovetail Jell-O. Or perhaps your chest will be sturdy and meet all your needs. Either way, you win.
— Christopher Schwarz
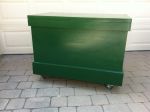
P.S. The photos in this post are of a chest made by Mike Russo, who had to put one together in a weekend for an upcoming move. Thanks Mike for the inspiring work.